
Principles and Operational Guide: Ethanol Distillation
Abstract:
Distillation is a classic method for separating and purifying liquid mixtures, fundamentally relying on the differences in boiling points among its components. We will detail how to purify ethanol from an ethanol-water mixture through simple distillation, covering its scientific principles, experimental apparatus, step-by-step procedures, key precautions, and practical applications.
I. Experimental Principle
Fundamental Principle of Distillation:
Distillation relies on the differences in volatility among components within a liquid mixture. When heated, the component with the lower boiling point (higher volatility) vaporizes first. By removing and condensing these vapors, a liquid enriched with that specific component is obtained, achieving separation and purification.
Special Characteristics of the Ethanol-Water System:
Pure ethanol boils at approximately 78.37°C, while pure water boils at 100°C. Theoretically, heating an ethanol-water mixture should cause ethanol to evaporate first. However, ethanol and water form a mixture known as an “azeotrope.” At atmospheric pressure, this azeotrope consists of approximately 95.6% ethanol and 4.4% water, boiling at 78.2°C.
This implies that simple distillation cannot yield anhydrous ethanol with a purity exceeding 95.6%. To overcome this limitation, specialized methods are required (such as dehydration by adding benzene to form a ternary azeotrope, or using molecular sieves). The objective of this experiment is to purify ethanol from low-concentration solutions (e.g., 10%-40%) to achieve a concentration close to the azeotropic composition (approximately 95%).
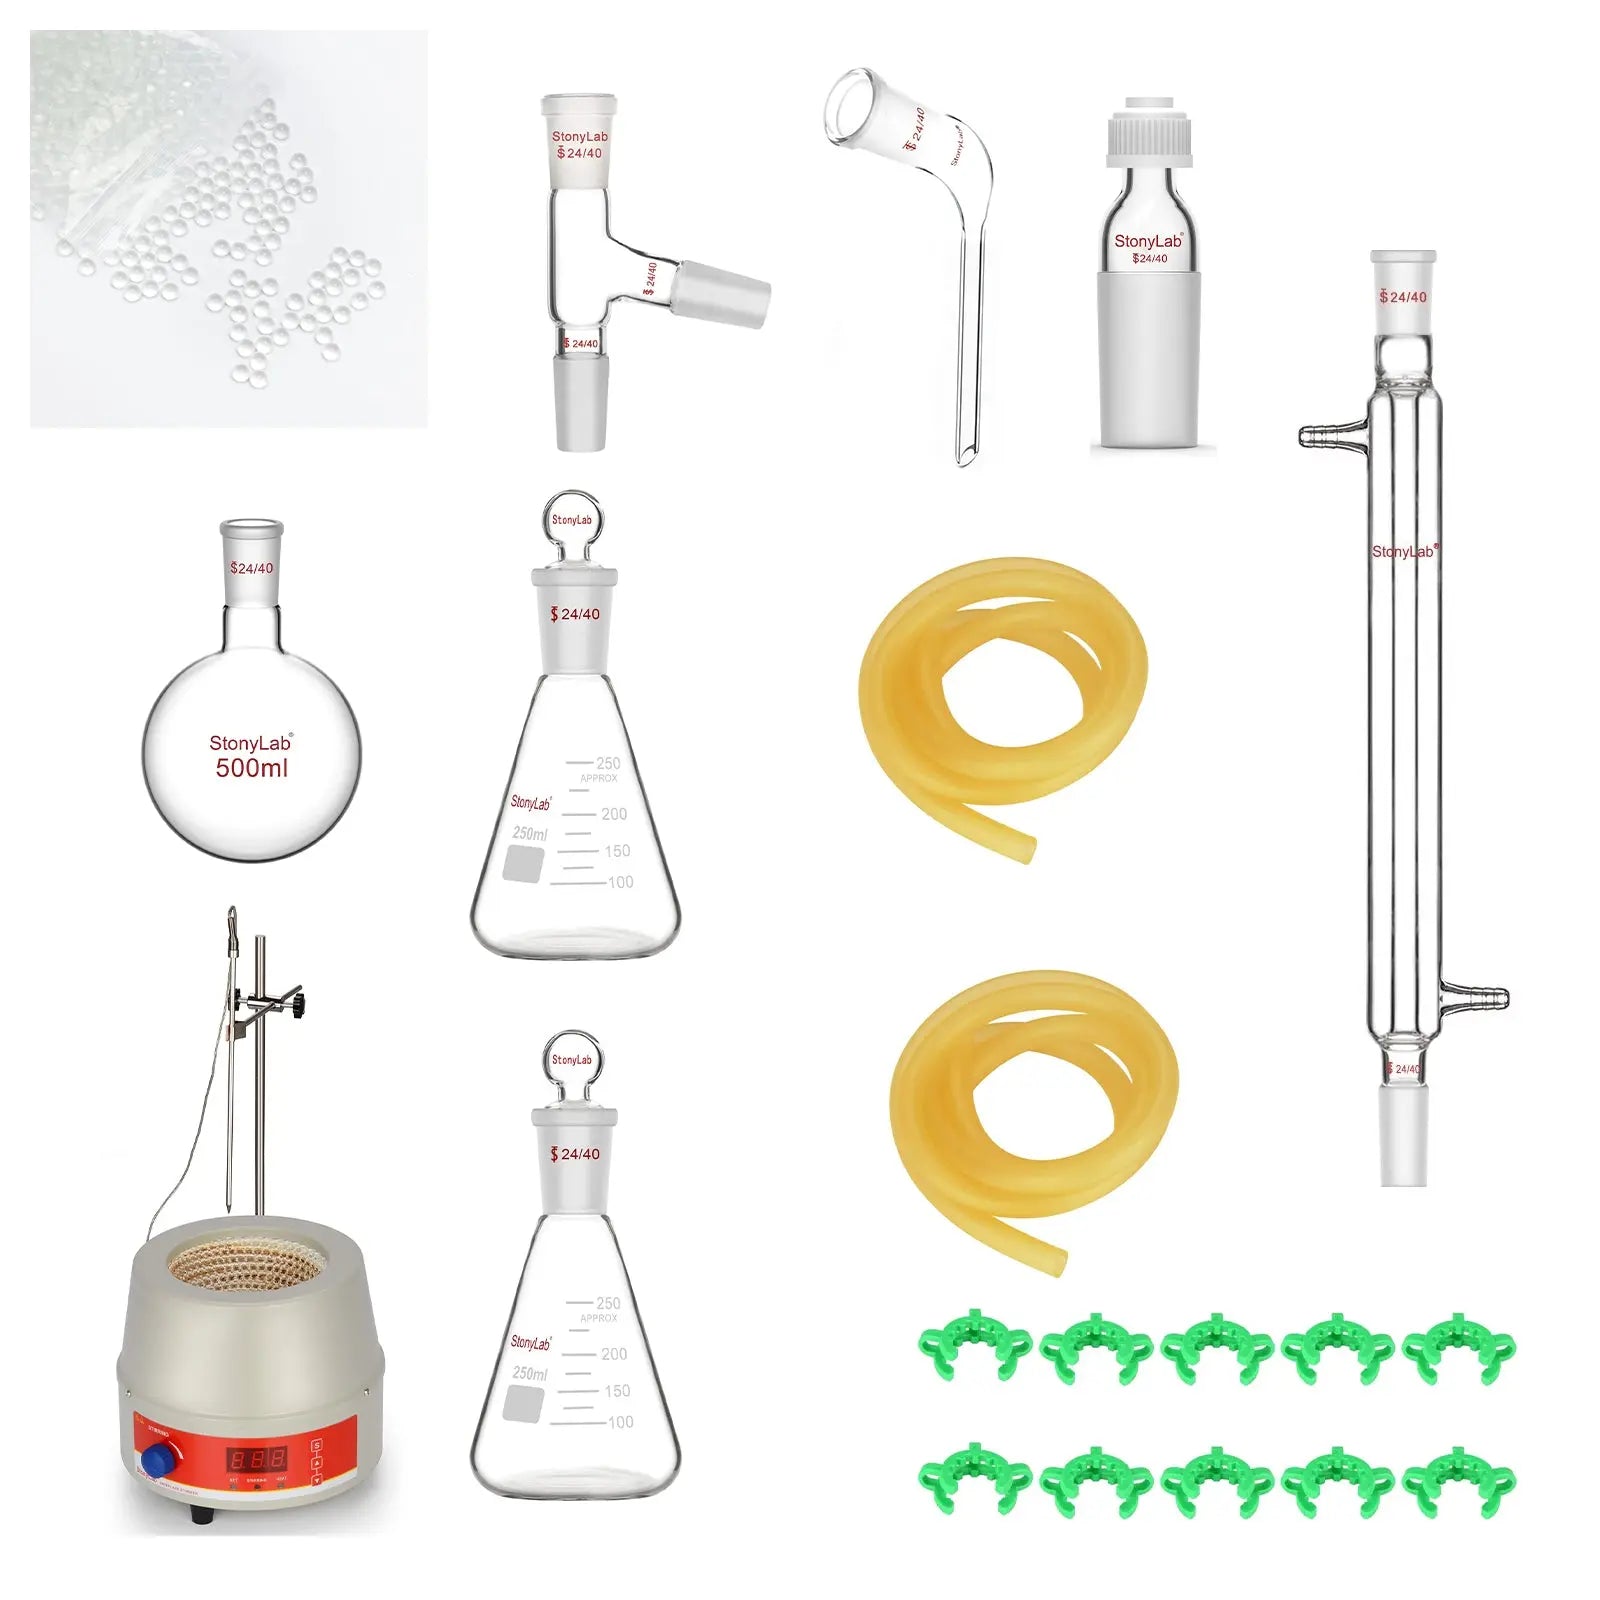
II. Experimental Apparatus and Reagents
Heating Mantle 500ml × 1
Round Bottom Flask 500ml × 1
Liebig Condenser 300ml × 1
Erlenmeyer Flask 250ml × 2
Distilling Connecting Adapter 24/40 × 1
Bent Distillation Adapter 24/40 × 1
Rubber Tubing 1m × 2
Plastic Joint Clips #24 × 1
Thermometer Inlet Adapter 24/40 × 1
Solid Glass Balls 3mm × 1
III. Experimental Procedure
Step 1: Apparatus Setup
Principle: Assemble from bottom to top, left to right; ensure stability and check for airtightness.
1. Secure heat source and flask: Place heating mantle centrally on table. Firmly clamp round-bottom flask neck with iron stand and clamp. Adjust height so flask base rests comfortably on heating mantle base.
2. Add ethanol solution and boiling stones: Pour ethanol solution into round-bottom flask, filling no more than 1/2 capacity. Add 2-3 boiling stones.
3. Install the distillation head and thermometer: Insert the distillation head into the flask neck. Place the thermometer into its sleeve and insert it into the straight port of the distillation head. Critical adjustment: The upper edge of the thermometer's mercury bulb must align with the lower edge of the distillation head's side arm opening. This ensures accurate measurement of vapor temperature.
4. Connect the condensation system: Secure the condenser tube and adjust its position to naturally connect with the distillation head's side arm. Ensure all connections are airtight.
5. Connect the receiving tube and receiver: Insert the receiving tube into the end of the condenser tube. Place a dry, clean conical flask beneath the tube end as the receiving vessel. All joints must be airtight to prevent ethanol vapor leakage (Flammable!).
6. Circulate cooling water: Connect the condenser tube with a rubber hose. Position the inlet at the bottom and the outlet at the top, ensuring “bottom inlet, top outlet.” This ensures the condenser remains fully submerged for optimal condensation.
Step 2: Heating and Distillation
Principle: Water flow first, then heating.
1. Activate cooling water: Turn on the faucet and adjust for steady, smooth flow.
2. Initiate heating: Power on the heating jacket and gradually increase temperature. Avoid high heat or intense flames initially.
3. Observation and recording:
As the liquid heats, boiling occurs and vapor rises along the flask walls.
Monitor the thermometer reading as the temperature steadily climbs. The initial liquid distilled (forerunner) typically consists of low-boiling impurities or residual liquid from the apparatus and should be discarded or not formally collected.
When the thermometer reading rises and stabilizes around 78°C, it indicates that ethanol vapor begins to distill steadily.
Step 3: Collecting Distillate
Principle: Collect under controlled temperature, replacing promptly.
Replace the receiving flask: When the temperature stabilizes within the target range (77-79°C) and the condensed liquid begins flowing in streams or dripping regularly, promptly replace it with a dry, clean receiving flask to formally collect the main fraction.
Why replace the new receiving bottle?
1. Low-boiling impurities: Ethanol feedstock may contain impurities with boiling points lower than ethanol (e.g., methanol, aldehydes, trace amounts of diethyl ether, etc.). During heating, these impurities are the first to be distilled off. If collected together, they will contaminate the final product.
2. Residual air and vapour within the apparatus: During the initial heating phase, air present within the distillation apparatus and residual vapour from previous operations are also expelled first.
3. Residues on the condenser walls: If the condenser has not been thoroughly dried, the initial liquid stream will carry away this moisture or other residues.
Consequently, the first fraction distilled is not collected.
Control distillation rate: Adjust the heating power to maintain a steady flow rate of 1-2 drops per second.
End distillation: When the thermometer reading shows a sustained increase (e.g., exceeding 82°C), indicating ethanol has largely evaporated and water begins to distill in large quantities, cease collection. First remove the heat source, then turn off the condenser water.
IV. Precautions and Safety Warnings
Ethanol is highly flammable! The entire experiment must be conducted in a well-ventilated environment (such as a fume hood), away from any open flames, electrical sparks, or high-temperature surfaces.
Wear personal protective equipment: including safety goggles, lab coats, and heat-resistant gloves.
Zeolite must be added in advance. If heating is interrupted and resumed later, new zeolite must be added only after the liquid has cooled.
The distillation apparatus must remain open to the atmosphere (do not block the end of the receiving tube) to prevent excessive pressure buildup and potential explosion.
Never allow the liquid in the flask to evaporate completely, as this may cause the flask to shatter.
V. Conclusions and Applications
Through this simple distillation experiment, we successfully purified ethanol from a low-concentration aqueous solution, significantly increasing its purity.
As a fundamental unit operation, distillation finds extensive applications in the following fields:
Laboratories: Purifying solvents and separating reaction products.
Industry: Petroleum refining, production of alcoholic beverages, and essential oil extraction.
Environmental Protection: Recovery of organic solvents.
Understanding its principles and mastering standardized procedures form a crucial foundation for scientific research and industrial production.
Related Products:
Ethanol Distillation Purification Kit, 12pcs |
 |
| Buy Now |